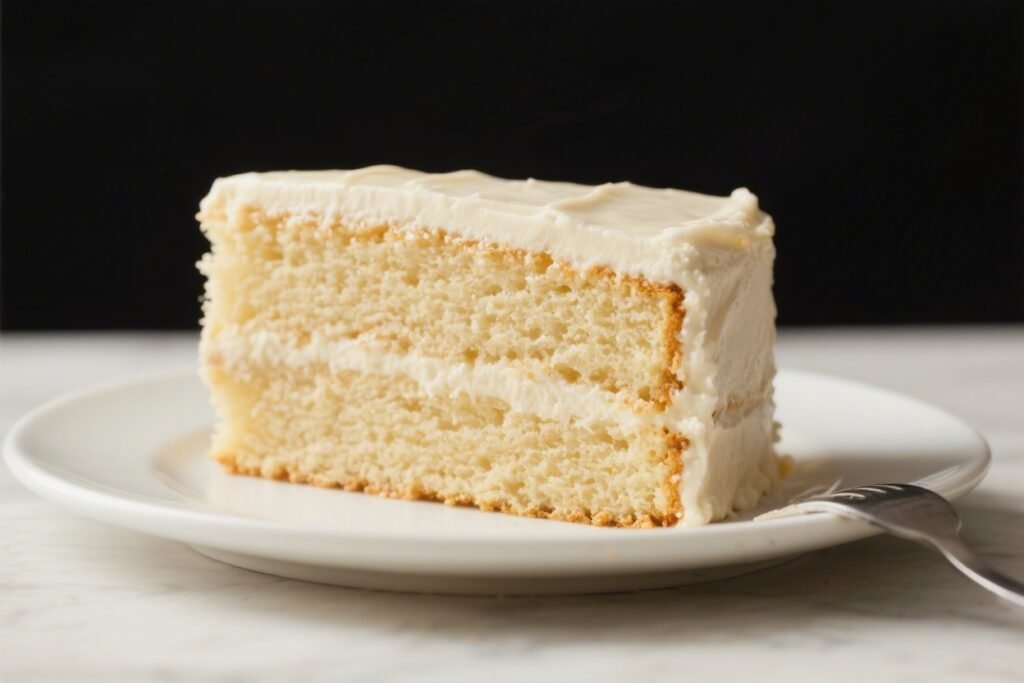
A good vanilla cake should be soft, moist, and full of warm vanilla flavor. This gluten-free version hits all those notes without feeling “alternative.” It bakes up with a fine crumb, sturdy enough for layers yet tender enough to enjoy plain. You don’t need special equipment or hard-to-find ingredients—just a reliable gluten-free flour blend and a few pantry staples.
Whether it’s for a birthday, a weekend bake, or a “just because” treat, this cake will make everyone at the table happy. No one will guess it’s gluten-free.
Gluten-Free Vanilla Cake - Soft, Tender, and Simple
Ingredients
- Gluten-free 1:1 all-purpose flour blend (with xanthan gum), 2 1/4 cups (290 g)
- Baking powder, 2 1/2 teaspoons
- Fine sea salt, 1/2 teaspoon
- Unsalted butter (softened), 6 tablespoons (85 g)
- Neutral oil (like canola or light olive), 1/3 cup (75 ml)
- Granulated sugar, 3/4 cup (150 g)
- Light brown sugar, 1/4 cup (50 g), packed
- Large eggs (room temperature), 3
- Pure vanilla extract, 2 1/2 teaspoons
- Buttermilk (room temperature), 3/4 cup (180 ml)
- Whole milk (room temperature), 1/4 cup (60 ml)
- Optional add-ins: 1 teaspoon almond extract for a bakery-style note; vanilla bean paste for stronger vanilla flavor
- For the frosting (optional but recommended): 1/2 cup (115 g) unsalted butter, 3 cups (360 g) powdered sugar, 1–2 tablespoons milk, 1 1/2 teaspoons vanilla, pinch of salt
Instructions
- Prep your pans: Heat the oven to 350°F (175°C). Grease and line two 8-inch round cake pans with parchment. Lightly flour with your gluten-free blend. This prevents sticking and helps with clean release.
- Whisk dry ingredients: In a medium bowl, whisk the gluten-free flour, baking powder, and salt. Set aside. This evenly distributes leavening and prevents clumps.
- Cream fats and sugars: In a large bowl, beat the softened butter, oil, granulated sugar, and brown sugar on medium speed for 2–3 minutes until light and fluffy. Scrape the bowl once to ensure even mixing.
- Add eggs and vanilla: Beat in the eggs one at a time. Mix for 20–30 seconds after each egg until well incorporated. Stir in the vanilla (and almond extract or vanilla paste if using).
- Alternate dry and wet: On low speed, add one-third of the dry mix, then half the buttermilk, another third of the dry, the whole milk, and finally the last third of dry. Mix just until combined. Do not overmix.
- Rest the batter briefly: Let the batter sit for 5–8 minutes. This gives the gluten-free flour time to hydrate, improving texture and preventing grittiness.
- Portion and level: Divide the batter evenly between the pans. Smooth the tops with a spatula and tap each pan gently on the counter to release air bubbles.
- Bake: Bake for 22–28 minutes. The cakes are done when the centers spring back to a light touch and a toothpick comes out with a few moist crumbs. Avoid overbaking.
- Cool: Let the cakes cool in the pans for 10 minutes. Run a thin knife around the edges, then invert onto a rack. Peel off parchment and cool completely.
- Make the frosting: Beat butter until creamy. Gradually add powdered sugar, then vanilla, salt, and 1 tablespoon milk. Add more milk as needed for a smooth, spreadable consistency.
- Assemble: Place one cake layer on a plate, add a generous layer of frosting, then set the second layer on top. Crumb coat the cake (a thin layer of frosting), chill 15 minutes, then finish frosting.
Why This Recipe Works

- Balanced moisture: A mix of oil and butter keeps the cake soft and flavorful. Butter adds richness; oil locks in moisture.
- Reliable structure: Using a quality 1:1 gluten-free flour blend with xanthan gum helps the cake rise evenly and hold together without crumbling.
- Room-temperature dairy and eggs: This ensures a smooth batter and even baking, which is crucial for gluten-free cakes.
- Buttermilk boost: The acidity helps with tenderness and adds a subtle tang that enhances vanilla.
- Two sugars, better texture: A touch of brown sugar adds moisture and depth, while granulated sugar keeps the crumb light.
What You’ll Need
- Gluten-free 1:1 all-purpose flour blend (with xanthan gum), 2 1/4 cups (290 g)
- Baking powder, 2 1/2 teaspoons
- Fine sea salt, 1/2 teaspoon
- Unsalted butter (softened), 6 tablespoons (85 g)
- Neutral oil (like canola or light olive), 1/3 cup (75 ml)
- Granulated sugar, 3/4 cup (150 g)
- Light brown sugar, 1/4 cup (50 g), packed
- Large eggs (room temperature), 3
- Pure vanilla extract, 2 1/2 teaspoons
- Buttermilk (room temperature), 3/4 cup (180 ml)
- Whole milk (room temperature), 1/4 cup (60 ml)
- Optional add-ins: 1 teaspoon almond extract for a bakery-style note; vanilla bean paste for stronger vanilla flavor
- For the frosting (optional but recommended): 1/2 cup (115 g) unsalted butter, 3 cups (360 g) powdered sugar, 1–2 tablespoons milk, 1 1/2 teaspoons vanilla, pinch of salt
How to Make It

- Prep your pans: Heat the oven to 350°F (175°C).
Grease and line two 8-inch round cake pans with parchment. Lightly flour with your gluten-free blend. This prevents sticking and helps with clean release.
- Whisk dry ingredients: In a medium bowl, whisk the gluten-free flour, baking powder, and salt.
Set aside. This evenly distributes leavening and prevents clumps.
- Cream fats and sugars: In a large bowl, beat the softened butter, oil, granulated sugar, and brown sugar on medium speed for 2–3 minutes until light and fluffy. Scrape the bowl once to ensure even mixing.
- Add eggs and vanilla: Beat in the eggs one at a time.
Mix for 20–30 seconds after each egg until well incorporated. Stir in the vanilla (and almond extract or vanilla paste if using).
- Alternate dry and wet: On low speed, add one-third of the dry mix, then half the buttermilk, another third of the dry, the whole milk, and finally the last third of dry. Mix just until combined. Do not overmix.
- Rest the batter briefly: Let the batter sit for 5–8 minutes.
This gives the gluten-free flour time to hydrate, improving texture and preventing grittiness.
- Portion and level: Divide the batter evenly between the pans. Smooth the tops with a spatula and tap each pan gently on the counter to release air bubbles.
- Bake: Bake for 22–28 minutes. The cakes are done when the centers spring back to a light touch and a toothpick comes out with a few moist crumbs.
Avoid overbaking.
- Cool: Let the cakes cool in the pans for 10 minutes. Run a thin knife around the edges, then invert onto a rack. Peel off parchment and cool completely.
- Make the frosting: Beat butter until creamy.
Gradually add powdered sugar, then vanilla, salt, and 1 tablespoon milk. Add more milk as needed for a smooth, spreadable consistency.
- Assemble: Place one cake layer on a plate, add a generous layer of frosting, then set the second layer on top. Crumb coat the cake (a thin layer of frosting), chill 15 minutes, then finish frosting.
Storage Instructions
- Room temperature: Keep the frosted cake covered for up to 2 days if your kitchen is cool.
A cake dome works best.
- Refrigerator: Store, covered, for 4–5 days. Let slices come to room temperature for 20–30 minutes before serving for best texture.
- Freezer: Wrap unfrosted layers tightly in plastic, then foil, and freeze for up to 2 months. Thaw in the fridge overnight before frosting.
- Frosting ahead: Buttercream keeps in the fridge for 1 week or freezer for 2 months.
Bring to room temp and re-whip before using.
Health Benefits
- Gluten-free friendly: Ideal for those with celiac disease or gluten sensitivity, without sacrificing flavor.
- Controlled ingredients: Baking at home means you skip preservatives and can choose high-quality dairy, organic sugar, or reduced-sugar frosting.
- Digestive comfort: When gluten triggers discomfort, a well-formulated gluten-free cake can offer a gentler option for celebrations.
- Adaptable: You can swap dairy or sugar levels to suit different dietary needs while keeping the cake delicious.
What Not to Do
- Don’t skip the xanthan gum if your flour blend doesn’t include it. Without it, the cake may be crumbly and dry.
- Don’t overmix once the flour goes in. Overworking the batter can make the crumb dense.
- Don’t overbake. Gluten-free cakes dry out faster.
Start checking a few minutes early.
- Don’t use cold ingredients. Cold eggs and dairy can cause a curdled batter and uneven rise.
- Don’t skip the rest time. A short batter rest improves hydration and texture.
Alternatives
- Dairy-free: Use dairy-free butter and plant milk (oat or almond). For acidity, add 1 teaspoon lemon juice or vinegar to the plant milk to mimic buttermilk.
- Egg-free: Replace each egg with 3 tablespoons aquafaba or use a commercial egg replacer as directed. Expect a slightly denser crumb.
- Refined sugar–light: Use coconut sugar in the batter and a reduced-sugar frosting.
Flavor will be slightly caramel-like and color a bit darker.
- Single-layer cake: Bake in a 9×13-inch pan for 25–32 minutes. Easy for potlucks and simpler frosting.
- Cupcakes: Bake at 350°F (175°C) for 16–20 minutes. Fill liners two-thirds full.
Yields about 18–20 cupcakes.
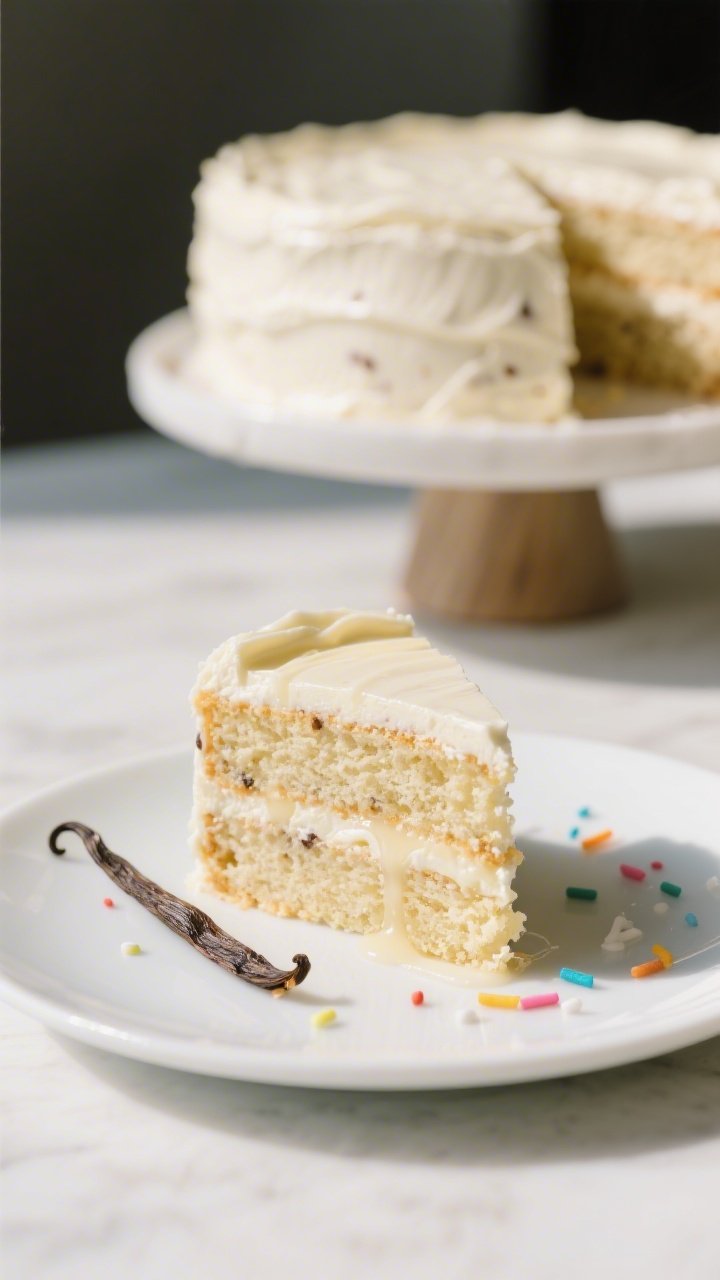
- Flavor twists: Add lemon zest and a lemon glaze, fold in rainbow sprinkles for funfetti, or brush layers with vanilla syrup for extra moisture.
FAQ
Which gluten-free flour blend works best?
A high-quality 1:1 all-purpose blend that includes xanthan gum is ideal. Look for one designed to replace wheat flour cup-for-cup. Avoid single flours like almond or rice alone; they don’t provide the right structure on their own.
Can I make it ahead?
Yes.
Bake the layers a day ahead, wrap tightly once cool, and keep at room temperature or in the fridge. Frost the next day. You can also freeze unfrosted layers for longer storage.
Why did my cake sink in the middle?
Common reasons include underbaking, too much leavening, or opening the oven door early.
Also check that your batter was mixed just until combined and that your oven is fully preheated.
How do I get a stronger vanilla flavor?
Use a combination of pure vanilla extract and vanilla bean paste, or scrape a vanilla bean into the batter. You can also brush the baked layers with a simple vanilla syrup.
Can I reduce the sugar?
You can trim the sugar in the batter by about 2–3 tablespoons without major issues. Larger cuts may affect moisture and texture.
Consider reducing sweetness in the frosting instead.
Is buttermilk necessary?
Buttermilk helps tenderness and flavor, but you can substitute whole milk mixed with 1 teaspoon lemon juice or vinegar. Let it sit for 5 minutes before using.
What if my flour blend doesn’t have xanthan gum?
Add 1 teaspoon xanthan gum to the dry ingredients. This improves binding and structure so the cake holds together well.
Can I bake this as three layers?
Yes.
Divide the batter among three 6-inch pans and reduce bake time to about 18–22 minutes, checking early. Keep layers thin and even for clean stacking.
How do I measure gluten-free flour correctly?
Use a scale for best results. If using cups, fluff the flour, spoon it into the cup, and level it off.
Scooping directly can pack in too much flour and make the cake dry.
Why rest the batter before baking?
A short rest lets the flour fully hydrate, smoothing the texture and reducing grittiness. It’s a small step that makes a noticeable difference in gluten-free baking.
Wrapping Up
This Gluten-Free Vanilla Cake delivers everything you want from a classic vanilla dessert: a tender crumb, balanced sweetness, and clean vanilla flavor. It’s simple to make and flexible enough for birthdays, weddings, or a casual afternoon treat.
With a few smart techniques—proper flour, room-temperature ingredients, and a quick batter rest—you’ll get bakery-worthy results at home. Keep this recipe handy; it’s a dependable staple you’ll use again and again.
Printable Recipe Card
Want just the essential recipe details without scrolling through the article? Get our printable recipe card with just the ingredients and instructions.